CSS
当您想改变网站风格时,需要使用 CSS. 同样,GTK 也支持自己的 CSS 变体,以便为应用程序设计样式。
在本章中,我们不会对所用的每一种语法进行解释。 如果你是 CSS 的新手,或者需要复习一下,请查看 MDN Web 文档。
比方说,我们有一个按钮,希望将其字体颜色设置为品红色。 每种类型的控件都有一个对应的 CSS 节点。 对于 gtk::Button,这个节点被称为 button. 因此,我们创建了一个内容如下的 style.css 文件:
button {
  color: magenta;
}
接下来,我们需要在应用程序的启动步骤中加载 CSS 文件。 像往常一样,控件是在"激活"步骤中创建的。
use gdk::Display;
use gtk::prelude::*;
use gtk::{gdk, glib, Application, ApplicationWindow, Button, CssProvider};

const APP_ID: &str = "org.gtk_rs.Css1";

fn main() -> glib::ExitCode {
    // Create a new application
    let app = Application::builder().application_id(APP_ID).build();

    // Connect to signals
    app.connect_startup(|_| load_css());
    app.connect_activate(build_ui);

    // Run the application
    app.run()
}

fn load_css() {
    // Load the CSS file and add it to the provider
    let provider = CssProvider::new();
    provider.load_from_string(include_str!("style.css"));

    // Add the provider to the default screen
    gtk::style_context_add_provider_for_display(
        &Display::default().expect("Could not connect to a display."),
        &provider,
        gtk::STYLE_PROVIDER_PRIORITY_APPLICATION,
    );
}

fn build_ui(app: &Application) {
    // Create button
    let button = Button::builder()
        .label("Press me!")
        .margin_top(12)
        .margin_bottom(12)
        .margin_start(12)
        .margin_end(12)
        .build();

    // Create a new window and present it
    let window = ApplicationWindow::builder()
        .application(app)
        .title("My GTK App")
        .child(&button)
        .build();
    window.present();
}
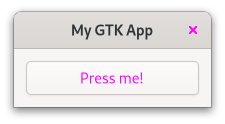
现在运行应用程序时,我们会发现按钮和窗口上的"关闭"按钮都变成了品红色。 这可能不是我们想要的结果,但我们的 CSS 代码段就是这么做的。 我们没有指定该规则应适用于哪个按钮,因此它同时适用于全部两个按钮。
在使用 CSS 时,
GtkInspector可谓得心应手(不仅如此)。 确保您的应用程序窗口处于焦点状态,然后按下 Ctrl + Shift + D. 这时会弹出一个窗口,您可以浏览甚至操作应用程序的状态。 打开 CSS 视图,用以下代码段覆盖按钮颜色。button { color: blue; }使用暂停按钮可以切换 CSS 代码的活动状态。
GTK 实现的样式类
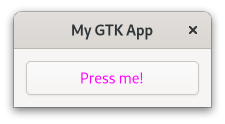
类选择器是选择 CSS 规则适用于哪些特定元素的一种方法。 GTK 为许多控件添加了样式类,通常取决于它们的内容。 例如,当 gtk::Button 的内容是一个标签时,它就会获得 text-button 样式类。 因此,我们创建了一条新的 CSS 规则,它只适用于样式类为 text_button 的按钮节点。
button.text-button {
  color: magenta;
}
Now only the font of our button becomes magenta.
添加你自己的样式类
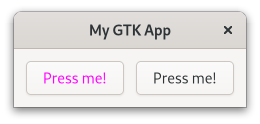
通过 add_css_class,我们还可以为控件添加自己的样式类。 这种方法的一种使用情况是,当你希望一条规则适用于一组精心挑选的部件时。 例如,我们有两个按钮,但只想让其中一个使用品红色字体。 依靠 GTK 添加的某个样式类是没有用的,因为两个按钮的样式是一样的。 这就是为什么我们要为第一个按钮添加 button-1 样式类。
use gdk::Display;
use gtk::prelude::*;
use gtk::{gdk, glib, Application, ApplicationWindow, Button, CssProvider};
const APP_ID: &str = "org.gtk_rs.Css3";
fn main() -> glib::ExitCode {
// Create a new application
let app = Application::builder().application_id(APP_ID).build();
// Connect to signals
app.connect_startup(|_| load_css());
app.connect_activate(build_ui);
// Run the application
app.run()
}
fn load_css() {
// Load the CSS file and add it to the provider
let provider = CssProvider::new();
provider.load_from_string(include_str!("style.css"));
// Add the provider to the default screen
gtk::style_context_add_provider_for_display(
&Display::default().expect("Could not connect to a display."),
&provider,
gtk::STYLE_PROVIDER_PRIORITY_APPLICATION,
);
}
fn build_ui(app: &Application) {
// Create buttons
let button_1 = Button::with_label("Press me!");
let button_2 = Button::with_label("Press me!");
button_1.add_css_class("button-1");
// Create `gtk_box` and add buttons
let gtk_box = gtk::Box::builder()
.margin_top(12)
.margin_bottom(12)
.margin_start(12)
.margin_end(12)
.spacing(12)
.build();
gtk_box.append(&button_1);
gtk_box.append(&button_2);
// Create a new window and present it
let window = ApplicationWindow::builder()
.application(app)
.title("My GTK App")
.child(>k_box)
.build();
window.present();
}然后,我们创建一条 CSS 规则,该规则适用于样式类为 button-1 的按钮节点。
button.button-1 {
  color: magenta;
}
我们可以看到,这样只有第一个按钮被染成了品红色。
指定控件名称
如果您希望您的规则只适用于一个部件,那么使用样式类进行匹配也是可以的。 不过,理想情况下,您应该给控件取一个名字,然后用这个名字进行匹配。 这样,你的意图就会更明确,而不是匹配可适用于多个控件的样式类。
同样,我们有两个按钮,但只想将其中一个按钮染成洋红色。 我们使用 set_widget_name 设置第一个按钮的名称。
use gdk::Display;
use gtk::prelude::*;
use gtk::{gdk, glib, Application, ApplicationWindow, Button, CssProvider};
const APP_ID: &str = "org.gtk_rs.Css4";
fn main() -> glib::ExitCode {
// Create a new application
let app = Application::builder().application_id(APP_ID).build();
// Connect to signals
app.connect_startup(|_| load_css());
app.connect_activate(build_ui);
// Run the application
app.run()
}
fn load_css() {
// Load the CSS file and add it to the provider
let provider = CssProvider::new();
provider.load_from_string(include_str!("style.css"));
// Add the provider to the default screen
gtk::style_context_add_provider_for_display(
&Display::default().expect("Could not connect to a display."),
&provider,
gtk::STYLE_PROVIDER_PRIORITY_APPLICATION,
);
}
fn build_ui(app: &Application) {
// Create buttons
let button_1 = Button::with_label("Press me!");
let button_2 = Button::with_label("Press me!");
button_1.set_widget_name("button-1");
// Create `gtk_box` and add buttons
let gtk_box = gtk::Box::builder()
.margin_top(12)
.margin_bottom(12)
.margin_start(12)
.margin_end(12)
.spacing(12)
.build();
gtk_box.append(&button_1);
gtk_box.append(&button_2);
// Create a new window and present it
let window = ApplicationWindow::builder()
.application(app)
.title("My GTK App")
.child(>k_box)
.build();
window.present();
}然后,创建一条适用于名称为 button-1 的按钮节点的 CSS 规则。 名称在 # 符号后指定。
button#button-1 {
  color: magenta;
}
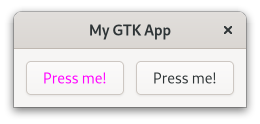
同样,样式规则只适用于第一个按钮。
GTK 提供的 CSS 规则
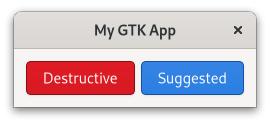
某些样式非常常见,GTK 为其提供了 CSS 规则。 例如,如果您想在按钮上标明 "破坏性动作"或"建议的动作",您就不必提供自己的 CSS 规则。 您只需在按钮上添加 "破坏性动作(destructive-action)"或 "建议的动作(suggested-action)"样式类即可。 大多数控件都会在 CSS 节点下的文档中记录这些规则。
use gtk::glib;
use gtk::prelude::*;
use gtk::{Application, ApplicationWindow, Button};
const APP_ID: &str = "org.gtk_rs.Css5";
fn main() -> glib::ExitCode {
// Create a new application
let app = Application::builder().application_id(APP_ID).build();
// Connect to signals
app.connect_activate(build_ui);
// Run the application
app.run()
}
fn build_ui(app: &Application) {
// Create buttons
let button_1 = Button::with_label("Destructive");
let button_2 = Button::with_label("Suggested");
button_1.add_css_class("destructive-action");
button_2.add_css_class("suggested-action");
// Create `gtk_box` and add buttons
let gtk_box = gtk::Box::builder()
.margin_top(12)
.margin_bottom(12)
.margin_start(12)
.margin_end(12)
.spacing(6)
.build();
gtk_box.append(&button_1);
gtk_box.append(&button_2);
// Create a new window and present it
let window = ApplicationWindow::builder()
.application(app)
.title("My GTK App")
.child(>k_box)
.build();
window.present();
}
界面生成器
我们还可以使用界面生成器添加样式类。 只需在 widget 中添加 <style> 元素即可。 <style> 元素与 gtk::Widget 一起记录。 再次添加破坏性和建议的按钮,看起来就像这样:
文件名:listings/css/6/window/window.ui
<?xml version="1.0" encoding="UTF-8"?>
<interface>
  <template class="MyGtkAppWindow" parent="GtkApplicationWindow">
    <property name="title" translatable="yes">My GTK App</property>
    <child>
      <object class="GtkBox">
        <property name="margin-top">12</property>
        <property name="margin-bottom">12</property>
        <property name="margin-start">12</property>
        <property name="margin-end">12</property>
        <property name="spacing">6</property>
        <child>
          <object class="GtkButton">
            <property name="label">Destructive</property>
            <style>
              <class name="destructive-action"/>
            </style>
          </object>
        </child>
        <child>
          <object class="GtkButton">
            <property name="label">Suggested</property>
            <style>
              <class name="suggested-action"/>
            </style>
          </object>
        </child>
      </object>
    </child>
  </template>
</interface>
伪类
有时,你希望 CSS 规则在比样式类更精确的条件下应用。 这就是伪类的用武之地。 让我们使用名称为 button-1 的按钮来演示这一概念。
文件名:listings/css/7/window/window.ui
<?xml version="1.0" encoding="UTF-8"?>
<interface>
  <template class="MyGtkAppWindow" parent="GtkApplicationWindow">
    <property name="title" translatable="yes">My GTK App</property>
    <child>
      <object class="GtkButton">
        <property name="label">Hover over me!</property>
        <property name="margin-top">12</property>
        <property name="margin-bottom">12</property>
        <property name="margin-start">12</property>
        <property name="margin-end">12</property>
        <property name="name">button-1</property>
      </object>
    </child>
  </template>
</interface>
通过添加伪类 hover,我们表示希望这条规则只适用于当鼠标指针悬停在名称为 button-1 的按钮节点。
button#button-1:hover {
  color: magenta;
  background: yellow;
}
现在,如果我们将鼠标悬停在按钮上,就会发现在一瞬间按钮的背景变成了黄色,文字变成了品红色。 当我们移除光标后,按钮又恢复到原来的状态。
节点
在前面的示例中,一个部件总是对应一个 CSS 节点。 但情况并非总是如此。 例如,gtk::MenuButton 就有多个 CSS 节点。
首先,我们创建一个 MenuButton.
文件名:listings/css/8/window/window.ui
<?xml version="1.0" encoding="UTF-8"?>
<interface>
  <template class="MyGtkAppWindow" parent="GtkApplicationWindow">
    <property name="title" translatable="yes">My GTK App</property>
    <child>
      <object class="GtkMenuButton">
        <property name="margin-top">12</property>
        <property name="margin-bottom">12</property>
        <property name="margin-start">12</property>
        <property name="margin-end">12</property>
      </object>
    </child>
  </template>
</interface>
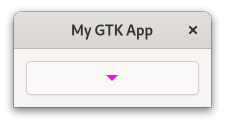
您可以让菜单按钮( MenuButton )显示图标或标签。 如果您选择两者都不显示,就像我们目前所做的那样,它将显示一个箭头图像。
CSS 节点的继承树就显示了这种情况:
menubutton
╰── button.toggle
    ╰── <content>
         ╰── [arrow]
我们看到,menubutton 节点有子节点,而子节点本身也有子节点和附加样式类。 现在我们知道,必须添加一条适用于箭头(arrow)节点的 CSS 规则,它是 menubutton 的子节点。
menubutton arrow {
  color: magenta;
}
的确,我们得到了一个带有品红色箭头的 MenuButton。
设置 CSS 名称并使用导出颜色
我们已经学习了如何使用伪类为部件实例命名。 但如果我们有一个自定义控件,并想引用它的所有实例,该怎么办呢? 让我们通过再次用待办事项应用来看看如何处理这种情况。
TaskRow 类继承于 gtk::Box,因此我们可以只匹配节点 box. 但是,在这种情况下,我们也会匹配其他 gtk::Box 的实例。 我们要做的是为 TaskRow 赋予自己的 CSS 名称。 调用 set_css_name 时,我们会更改控件类的 CSS 节点名称。 在我们的例子中,TaskRow 就对应于节点 task-row.
文件名:listings/todo/3/task_row/imp.rs
use std::cell::RefCell;

use glib::Binding;
use gtk::subclass::prelude::*;
use gtk::{glib, CheckButton, CompositeTemplate, Label};

// Object holding the state
#[derive(Default, CompositeTemplate)]
#[template(resource = "/org/gtk_rs/Todo3/task_row.ui")]
pub struct TaskRow {
    #[template_child]
    pub completed_button: TemplateChild<CheckButton>,
    #[template_child]
    pub content_label: TemplateChild<Label>,
    // Vector holding the bindings to properties of `TaskObject`
    pub bindings: RefCell<Vec<Binding>>,
}

// The central trait for subclassing a GObject
#[glib::object_subclass]
impl ObjectSubclass for TaskRow {
    // `NAME` needs to match `class` attribute of template
    const NAME: &'static str = "TodoTaskRow";
    type Type = super::TaskRow;
    type ParentType = gtk::Box;

    fn class_init(klass: &mut Self::Class) {
        klass.bind_template();
        klass.set_css_name("task-row");
    }

    fn instance_init(obj: &glib::subclass::InitializingObject<Self>) {
        obj.init_template();
    }
}

// Trait shared by all GObjects
impl ObjectImpl for TaskRow {}

// Trait shared by all widgets
impl WidgetImpl for TaskRow {}

// Trait shared by all boxes
impl BoxImpl for TaskRow {}
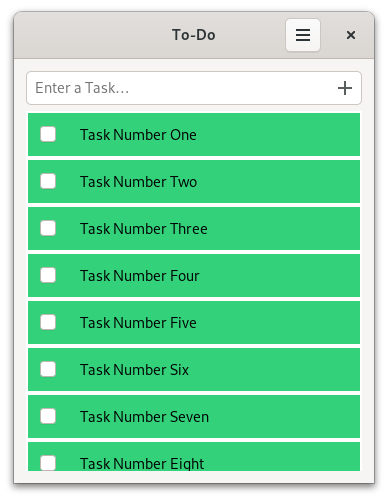
现在该如何处理新的节点名称呢? 让我们再次更改背景颜色,但这次有点不一样,我们将使用名为 success_color 的颜色。
文件名:listings/todo/3/resources/style.css
task-row {
  background-color: @success_color;
}
GTK 的默认(Default)样式表为各种用途提供了预定义的颜色。 在源代码中,我们可以找到 success_color 颜色,在实际场景中,它用来表示成功。 然后,我们可以通过在名称前添加 @ 来访问预定义的颜色。
我们还必须在 resources.gresource.xml 中添加 style.css.
文件名:listings/todo/3/resources/resources.gresource.xml
 <?xml version="1.0" encoding="UTF-8"?>
 <gresources>
   <gresource prefix="/org/gtk_rs/Todo3/">
     <file compressed="true" preprocess="xml-stripblanks" alias="gtk/help-overlay.ui">shortcuts.ui</file>
     <file compressed="true" preprocess="xml-stripblanks">task_row.ui</file>
     <file compressed="true" preprocess="xml-stripblanks">window.ui</file>
+    <file compressed="true">style.css</file>
   </gresource>
 </gresources>
此外,我们还在 connect_startup 中调用了 load_css().
mod task_object;
mod task_row;
mod utils;
mod window;

use gdk::Display;
use gtk::prelude::*;
use gtk::{gdk, gio, glib, Application, CssProvider};
use window::Window;

const APP_ID: &str = "org.gtk_rs.Todo3";

fn main() -> glib::ExitCode {
    gio::resources_register_include!("todo_3.gresource")
        .expect("Failed to register resources.");

    // Create a new application
    let app = Application::builder().application_id(APP_ID).build();

    // Connect to signals
    app.connect_startup(|app| {
        setup_shortcuts(app);
        load_css()
    });
    app.connect_activate(build_ui);

    // Run the application
    app.run()
}

fn setup_shortcuts(app: &Application) {
    app.set_accels_for_action("win.filter('All')", &["<Ctrl>a"]);
    app.set_accels_for_action("win.filter('Open')", &["<Ctrl>o"]);
    app.set_accels_for_action("win.filter('Done')", &["<Ctrl>d"]);
}

fn load_css() {
    // Load the CSS file and add it to the provider
    let provider = CssProvider::new();
    provider.load_from_resource("/org/gtk_rs/Todo3/style.css");

    // Add the provider to the default screen
    gtk::style_context_add_provider_for_display(
        &Display::default().expect("Could not connect to a display."),
        &provider,
        gtk::STYLE_PROVIDER_PRIORITY_APPLICATION,
    );
}

fn build_ui(app: &Application) {
    // Create a new custom window and present it
    let window = Window::new(app);
    window.present();
}
load_css() 与本章开头显示的非常相似。 不过,这次我们使用 load_from_resource() 来加载样式。
mod task_object;
mod task_row;
mod utils;
mod window;

use gdk::Display;
use gtk::prelude::*;
use gtk::{gdk, gio, glib, Application, CssProvider};
use window::Window;

const APP_ID: &str = "org.gtk_rs.Todo3";

fn main() -> glib::ExitCode {
    gio::resources_register_include!("todo_3.gresource")
        .expect("Failed to register resources.");

    // Create a new application
    let app = Application::builder().application_id(APP_ID).build();

    // Connect to signals
    app.connect_startup(|app| {
        setup_shortcuts(app);
        load_css()
    });
    app.connect_activate(build_ui);

    // Run the application
    app.run()
}

fn setup_shortcuts(app: &Application) {
    app.set_accels_for_action("win.filter('All')", &["<Ctrl>a"]);
    app.set_accels_for_action("win.filter('Open')", &["<Ctrl>o"]);
    app.set_accels_for_action("win.filter('Done')", &["<Ctrl>d"]);
}

fn load_css() {
    // Load the CSS file and add it to the provider
    let provider = CssProvider::new();
    provider.load_from_resource("/org/gtk_rs/Todo3/style.css");

    // Add the provider to the default screen
    gtk::style_context_add_provider_for_display(
        &Display::default().expect("Could not connect to a display."),
        &provider,
        gtk::STYLE_PROVIDER_PRIORITY_APPLICATION,
    );
}

fn build_ui(app: &Application) {
    // Create a new custom window and present it
    let window = Window::new(app);
    window.present();
}
这就是更改后的任务行的样子。 也许最好立即还原……
改造待办事项应用
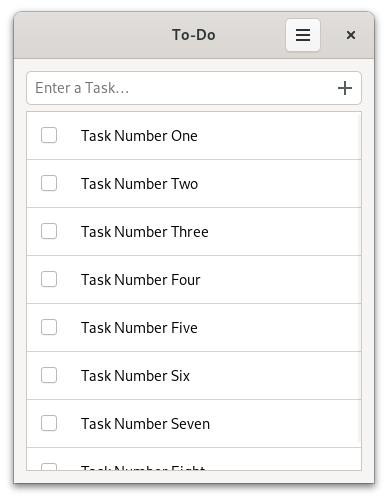
幸运的是,在我们的待办事项应用程序中找到 CSS 的实际用途并不难。 到目前为止,不同的任务还没有很好地分隔开来。 我们可以通过在 tasks_list 中添加 frame 和分隔符(separators)样式类来改变这种状况。
文件名:listings/todo/4/resources/window.ui
 <object class="GtkListView" id="tasks_list">
   <property name="valign">start</property>
+  <style>
+    <class name="frame"/>
+    <class name="separators"/>
+  </style>
 </object>
结论
定义 CSS 规则的方法有很多。 让我们简要回顾一下所学的语法。 下面的规则匹配节点 arrow,它是名称为 button-1、样式类为 toggle 和 text-button 的按钮节点的子对象。 当我们将鼠标悬停在箭头上时,该规则就会实际应用。
button#button-1.toggle.text-button arrow:hover {
  color: magenta;
}
当规则应用时,颜色参数将被设置为品红色。 您可以在 GTK 文档中找到支持参数的完整列表。